How to resize partition on Windows Server 2003
Resize partition means change the partition size of existing disk volumes. The typical issue on Windows Server 2003 is lacking of free disk space in the system C: drive, while there are plenty of free space in other volumes such as D. So many people wonder if it is possible to resize partition on Windows Server 2003 directly, because it is the fastest way to solve C drive out of space issue.
It is not a small thing to resize existing partitions especially on a server. A slight error may cause system boot failure or data loss. Data safety and reliability are most important to a server, so to resize Server 2003 partition, you should select a reliable partitioning software. But don’t be too nervous, if you use the right tool and follow the right steps, the task to resize Server 2003 volume could be easy. In this article, I’ll show you how to resize partition in Windows Server 2003 (R2) without losing data.

2 points you should know before resizing partitions
1. No partitioning software can resize partition beyond 2 physical hard disks. That is to say, if drive C and D are in the same hard disk, you can extend C by shrinking D easily. But if D is in another hard disk, you cannot transfer the free space from it to C drive. To verify whether the drives are in the same disk or not, simply right click My Computer > Manage > Storage > Disk Management.
2. If you use hardware RAID arrays, such as RAID 0, 1, 5, 10, do not break RAID array or do any operations in the RAID controller. Actually, the steps to resize Server 2003 volume on RAID or VMware/Hyper-V are the same with resizing physical disk partitions.
Pay attention to data safety
As I said in the beginning, data safety is most important to a server, so you should pay more attention. Different with the read-only program. To resize partition on Windows Server 2003, the partitioning software will move all files in a volume to other locations, it also modify the parameters of disk, partition and files in MBR, DBR, file system and other places. Besides the ability to resize partition, hardware issue such as: low RAM memory, high CPU usage, especially power failure also cause damage. If the partitioning software cannot handle all these issue, there is risk of losing data.
To protect system and data intact while resizing partition, you may search NIUBI Partition Editor in Google, which is highly recommended by many professional editors. Because, it is integrated unique Roll-Back Protection technology. What’s that? The built-in Roll-Back technology can roll back the server to the status before resizing if any software error or hardware issue occurred during resizing. It roll back to the right status automatically and in a flash even if power failure. NIUBI Partition Editor is ONLY partition software than can ensure 100% data safety.
Resize partition faster to save time
Besides data safety, time is also important. Nobody likes to wait several hours, just watch resizing without doing anything else. Especially when reboot is required to resize partition, the longer time means less customers. The unique file-moving algorithm built-in NIUBI Partition Editor helps resize partition 30% – 300% faster than any other partitioning software, which is strictly tested. If you don’t believe it, just compare it with other tools in the same condition.
It is also able to extend NTFS partition without rebooting server, the less down time the better.
How to resize partition on Windows Server 2003 R2?
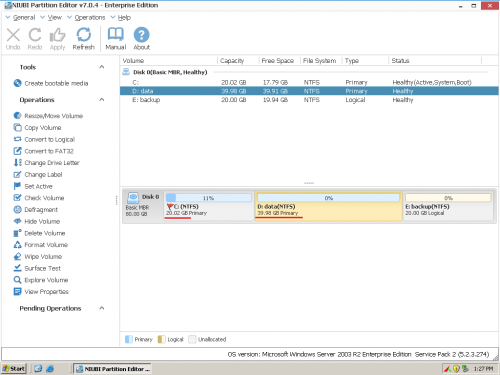
Download NIUBI Partition Editor Server, you’ll see all connected disk partition, which is the same with Disk Management.Check which volume has plenty of free space in the same disk. As long as there is free space in any data volumes, you can transfer into C drive. In most cases, there is enough free space in the adjacent volume D, so this is an example to shrink D and expand C.
Detailed steps to resize partitions on Windows Server 2003 (R2):
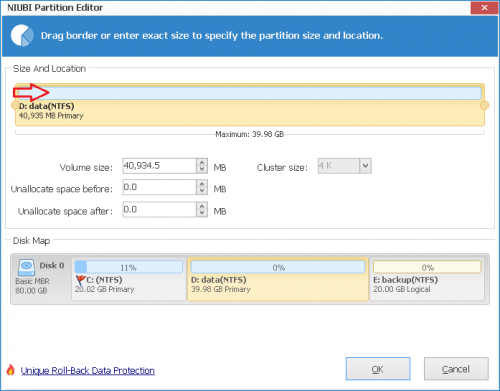
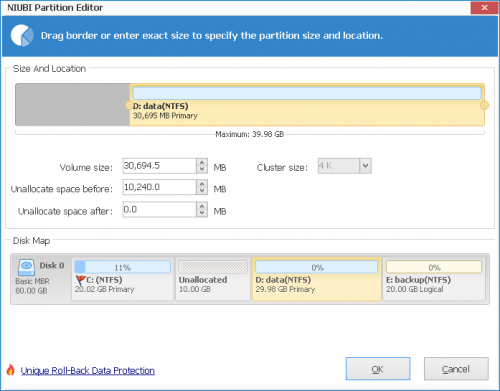
Step 1: Right click drive D and select “Resize/Move Volume“. In the pop-up window, drag the left border rightwards to shrink it.

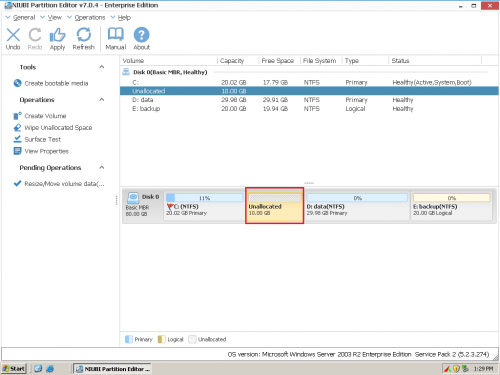
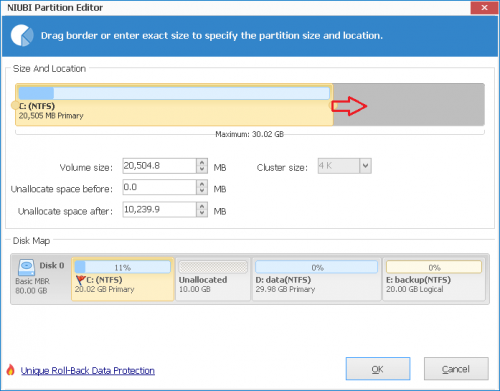
Click OK and back to the main window. 10GB Unallocated space generated behind C
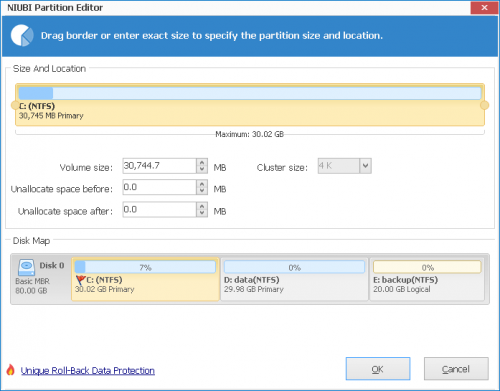
Step 2: Right click C and select “Resize/Move Volume” again. In the pop-up window, drag the right border rightwards to hold the Unallocated space.

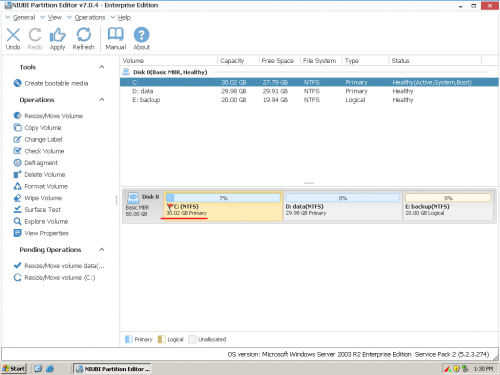
Step 3: Click OK and back to the main window, 10GB free space took from D added into C, click Apply on top left to execute, done.
If there is not enough free space in adjacent D drive, you can get free space from other volumes.
Watch video how to resize partition on Windows Server 2003
Is it easy to resize Server 2003 partitions?
If you have more than 2 servers, you may select Partition Editor Enterprise edition, which can be installed on unlimited PCs and servers within your company, regardless of locations.

