This article introduces how to increase disk space in Windows 7 without losing data. Step by step to increase free space of a partition or increase size of a disk.

Windows 7 has been released for such a long time and many users encountered the low disk space issue, especially to system partition C. In that case, nobody likes to reinstalling Operating System and all programs. It can't be better if you can increase disk space of the partition that is getting full. There are partitioning software that have this ability, but because there's potential data loss risk, you'd better back up first and run the safest tool.
Can't increase disk space via Disk Management
From Windows XP, Microsoft provides a Disk Management tool, which is able to create, delete and format partition. Windows 7 improved the ability of Disk Management by adding new Shrink Volume and Extend Volume functions, however, only NTFS partitions can be shrunk and extended.
Many people tried this native tool to increase disk space but failed, because both Shrink and Extend Volume functions have serious limitations. The most common issue is that Disk Management cannot extend a volume by shrinking any other one.
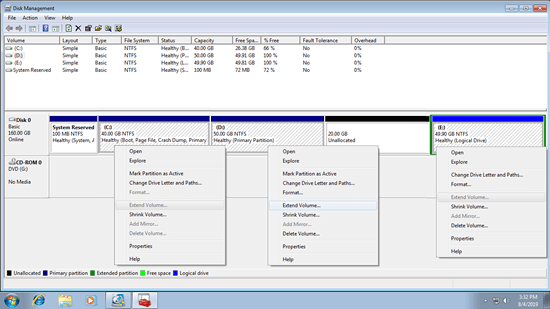
As the screen shot shows, Extend Volume greyed out for both C and E drive after shrinking D. This is because:
- Shrink Volume function can only make Unallocated space on the right while shrinking partition.
- Extend Volume function can only combine Unallocated space to the contiguous partition on the left.
Drive C is non-adjacent and E is on the right of the Unallocated space, therefore, Extend Volume function doesn't work.
Some people also tried to delete the right contiguous partition, thinking Extend Volume should work.
It works only when the partitions that you want to expand and delete are both Primary or Logical.
Free space deleted from a Logical drive can't be extended to any Primary partition. Unallocated space deleted from a Primary partition can't be extended to any Logical drives.
Do not delete drive D to increase disk space of C drive if you installed programs in it.
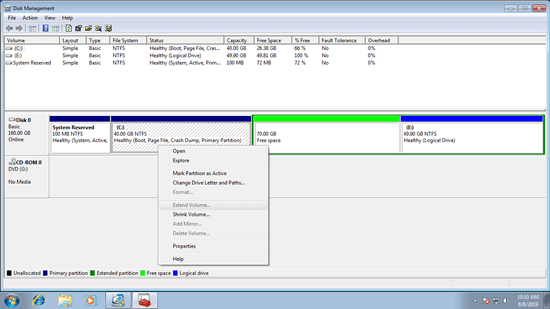
As the screen shot shows, drive C is Primary and original drive D is Logical, Extend Volume is disabled for C drive after deleting D.
With NIUBI Partition Editor, there is no such limitations and you just need to drag and drop on the disk map. Unallocated space can be made on either side and combined to any partitions on the same disk.
How to increase disk space of C or D drive
In most of Windows 7 computers, there is free unused space in a partition on the same disk, so you can shrink it to get Unallocated space. If the partition that you want to increase disk space is contiguous (on either side) to the Unallocated space, you can combine them together directly.
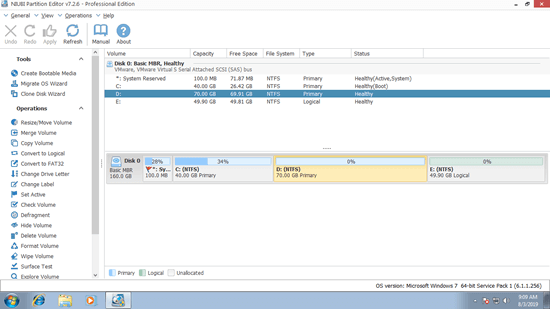
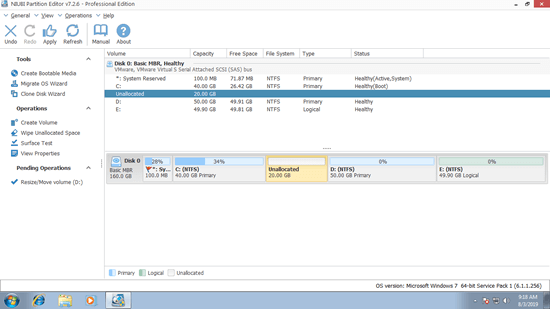
Download NIUBI Partition Editor, you'll see the main window with disk partition structure and other information. In my test computer, there are drive C, D, E and a system reserved partition in Disk 0.
For example, how to shrink D to increase C drive disk space in Windows 7:
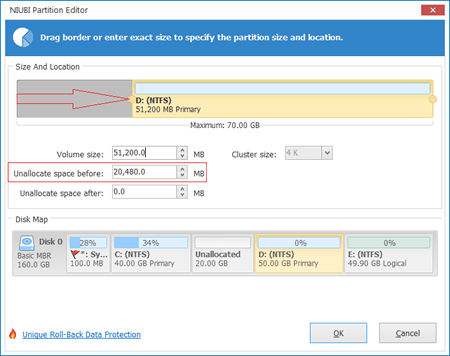
Step 1: right click drive D and select "Resize/Move Volume", in the pop-up window, drag left border towards right or enter an amount in the box of Unallocated space before.
Step 2: right click drive C and select "Resize/Move Volume", drag right border towards right in the pop-up window to combine the Unallocated space.
Step 3: click Apply on top left to execute. (All operations before this step only work in virtual mode.)
If you want to transfer free space from the nonadjacent drive E to C, there's an additional step to move partition D. If you want to expand drive D, it is similar.
How to increase size of a disk
If a partition is getting full but there's no available free space in all other partitions on the same disk, no software can increase its space from other separated disk. In that case, follow the step to clone disk to a larger one, while cloning, you can expand partition(s) with additional disk space.
If you run Windows 7 as guest virtual machine in VMware or Hyper-V, you can expand original disk directly.
After extending the disk, additional disk space will be shown as Unallocated on the end of original disk, run NIUBI Partition Editor and follow the steps above to combine Unallocated space to the partition(s).

